Thursday, July 15, 2010

Lady Gaga Telephone Inspired Macaron - Mac Attack 9 : Sing a song


A song, well I just can't get Telephone by Lady Gaga & Beyonce from the first time I listened to it. I love the clip, the use of bold colours, the concept and the storyline, it's different and this just make it so memorable. So I created some macs using the similar bold colours used in the clip. Primary colours - red, yellow and blue.

And don't worry it's not poisonous - proof is that my husband is still alive hehehe..:)

So here we go - the recipe

FOR THE MACARON SHELL
2 room temperatured egg white(80g total)
100g icing sugar
60g ground almond
60g castor sugar
1 tsp red powder food colouring
1 tsp yellow powder food colouring
1 tsp blue powder food colouring

Tools:
1. Big piping bag with a noozle no.8 placed inside.
2. 3 small size freezer bags, fold the bottom up to a side, then staple, making a piping bag. Repeat for all 3 bags.
3. 2 extra mixing bowls
4. 2 extra rubber spatulas


Method:
1. Put ground almond and icing sugar in a food processor or a small blender. Blend them finely.

2. Sift the blended mixture and set aside

3. With an electric beater, Beat the egg white, start from low speed and increase slowly to maximum speed. Beat until frothy (you will see lots of fine bubbles)

4. Now it's the time to add in the castor sugar, add half of the sugar, continue to beat in maximum speed for around 2 minutes, add in the other half, continue until you get very stiff peak.

5. Mix the dry ingredients into the egg whites. Just roughly combine them, because we'll seperate them in 3 parts later.

6. Divide the mixture into 3 parts - this mean you have to scoop out 1/3 of the mixture for each extra mixing bowl you have prepared earlier.

7. Now put in the yellow colouring into one bowl. Start folding

8. When you get smooth shiny mixture, stop folding, lift the mixture with spatula, if the mixture falls back slowly in the bowl means you're good to go. You could also check if the lines formed from the lifted mixture, they should slowly disappear in within 30 seconds. At this stage you're good to go. Do not over fold, it will be too liquid and becoming very hard to pipe.
if you're unsure, you could refer to my basic macaron recipe as a guide HERE

8. Do the same for the other two bowls of mixture with red and blue colourings.

9. Fill each freezer bag with each colour. Snip off the head of the freezer bags.


10. Carefully, place all 3 bags inside the bug piping bag. you might want to readjust accordingly so all 3 bags are about at the same level in the bag to make sure 3 colours flow out at the same time during the piping process. The first few macarons might have inconsistant colours, but it should go better as you pipe.


This month the Mac Tweet challange is to create macaron inspired by a song. I had been on and off doing many other stuff this month so I'm late! Just manage to get some macarons bake on the very last day to submit my entry.


11. Let your macarons sit for about 30minutes. This will depend on the humidity in your house and the day. Try touching the macaron softly, after 30mins. it should not stick to your hand.

12. Heat your oven to 150 C on the (heating on the top only). When the oven is ready, put your macaron at the very bottom shelf. Bake for 12 minutes, check them in the mid time of 6 minutes, the feets should already start forming. Turn the baking tray to the opposite direction to allow even baking. When the 6 mins is up, change the heating setting of your oven to Bottom only. This will help cooking the macaron and rise the feet more. Bake for another 6 minutes. You can test if the macaron is cook, touch softly on the shell and when the macaron doesn't slide on the feet, it's cooked. if it's not add another 1 mins each time and check.

(This is the method i found the best that works for me after few trial and error. I baked with heating the oven top and bottom and i had crack macarons. Having said that, every oven is slightly different than another, so please adjust accordingly

14. Let the macaron cool down before removing them. You could wet your working area and slide the baking sheet on it to speed up the cooling process, but do not let it sit there too long, if not the macarons will become soggy. Other wise you can leave them cool at room temperature and remove them.


Raspberry, Blueberry White Chocolate Ganache with hint of Rose

Ingredients
60g white chocolate (fiinely chopped)
70g fresh or frozen mix of raspberrie and blueberries
(If you use frozen fruits, bring them out prior to let them defroze)
1 tbsp rose water

Methods

1. In a medium pot boil some water.

2. Put white chocolate in the heat proof bowl, the let it sit over the pot with boiling water.

3. Stir until the chocolate is melted

4. With a hand mixer, blend the fruits to get the pulp. Then filter them with a sift with a help of a spoon, to remove any seeds that is left for a smooth texture.

5. Put the fruit pulp into a small pot, gently warm it up over medium heat, stir constantly.

6. When it's warm enough, pour it over the white chocolate. Then stir until the mixture is well combine and all chocolate is melted completely.

7. Leave to room temperature then in the fridge for at lease 2 hours for th ganache to harden up slightly.

8. When it's ready, pipe it on the macaron shells.

9. The mcarons are best eatiing 24 hours later. Bring them out of the fridge 10 minutes prior to fully enjoy the flavour.


Monday, June 07, 2010

Mactweets MacAttack 8 Entry - Wombat Macarons with Dark Chocolate Anis Ganache


The MacTweets round 7 challenge is to create macarons inspired by my favourite wild animal. So without any further thought, my favourite wild animal of course is the cute cuddly looking Aussie marsupial - WOMBAT.


All credit goes to the owner of this photo on Photoseek.com

Despite living 3 and half years in Australia, I have never seen a wombat in real. However I fall in love with them from the very first time I saw their photos. That also explain why I have 3 wombat plushies in 3 different sizes - which I named Mama Wombat, Baby Wombat and Mini W.

Initially I wanted to do square macarons, mimic the poos of wombat - They really poo cubic poops, just weird nature, isn't it? Ok, I probably shouldn't go on about poop since this is about food, I don't wanna gross you guys out!

After a few unsuscessful attempts on the square macarons, I came out with some other idea, Wombat shaped macarons. I think they might look more like bears, but Wombat kinda look like bear anyway.

I hope you guys will enjoy this recipe


To start, you will need one piping which you use normally to pipe macarons, plus another extra bag, with a small head to pipe the ears. You'll also need a small amount of black food colouring.

FOR THE MACARON SHELL
1 room temperatured egg white(39-40g)
50g icing sugar
28g ground almond
30g castor sugar
2g unsweetened cacao powder

Method:
1. Put ground almond, cacao powder and icing sugar in a food processor or a small blender. Blend them finely.

2. Sift the blended mixture and set aside

3. With an electric beater, Beat the egg white, start from low speed and increase slowly to maximum speed. Beat until frothy (you will see lots of fine bubbles)

4. Now it's the time to add in the castor sugar, add half of the sugar, continue to beat in maximum speed for around 2 minutes, add in the other half, continue until you get very stiff peak.

5. Mix the dry ingredients into the egg whites. This process is called Macaronage. Start folding with a rubber spatula. Continue to mix until you obtain a smooth lava flow batter.

6. When you get smooth shiny mixture, stop folding, lift the mixture with spatula, if the mixture falls back slowly in the bowl means you're good to go. You could also check if the lines formed from the lifted mixture, they should slowly disappear in within 30 seconds. At this stage you're good to go. Do not over fold, it will be too liquid and becoming very hard to pipe.
if you're unsure, you could refer to my basic macaron recipe as a guide HERE

7. After you get the right consistence, scoop out 1 tablepoon of the mixture, put it into the bag with small piping head, set aside.

8. In a small bowl, scoop out 1/2 teaspoon of the mixture. Add in some black food colouring, and mix through with a chopstick or something with pointy head. You'll use this later on to draw the eyes and noses.

9. I started out to pipe out 18 rounds shaped macaron (9 which I'll add ears to it, 9 which I'll leave it round)

10. After the piping is done, I piped out the ears of the wombats on 9 rounds which I piped out earlier.

11. With the help of chopstick, dip lightly in the black coloured mixture, carefully draw the eyes and noses on the shells with 'ears' on it.

12. Let your macarons sit for about 30minutes. This will depend on the humidity in your house and the day. Try touching the macaron softly, after 30mins. it should not stick to your hand.

13. Heat your oven to 150 C on the (heating on the top only). When the oven is ready, put your macaron at the very bottom shelf. Bake for 12 minutes, check them in the mid time of 6 minutes, the feets should already start forming. Turn the baking tray to the opposite direction to allow even baking. When the 6 mins is up, change the heating setting of your oven to Bottom only. This will help cooking the macaron and rise the feet more. Bake for another 6 minutes. You can test if the macaron is cook, touch softly on the shell and when the macaron doesn't slide on the feet, it's cooked. if it's not add another 1 mins each time and check.

(This is the method i found the best that works for me after few trial and error. I baked with heating the oven top and bottom and i had crack macarons. Having said that, every oven is slightly different than another, so please adjust accordingly)


14. Let the macaron cool down before removing them. You could wet your working area and slide the baking sheet on it to speed up the cooling process, but do not let it sit there too long, if not the macarons will become soggy. Other wise you can leave them cool at room temperature and remove them.


Dark Chocolate Anis Ganache

Ingredients
10g liquid cream
70g dark cooking chocolate(chopped)
4-5 drops of Anis Aroma.


Methods

1. In a medium pot over low heat, add in anis aroma and cream, stir and let it warms up.

2. When the cream is warm enough, remove from heat, add in the chopped chocolate.

3. Stir constantly until the chocolate is completely melted. You should get a smooth shiny finished ganache.

4. Let cool in room temperature for 30 mins or until it's no longer runny.

5. Pipe the round shaped macarons, and cover with the wombat macaron shells.

6. Keep cool in air tight container in the fridge.

7. Take them out of the fridge 20 mins prior eating.Enjoy!


Monday, May 31, 2010

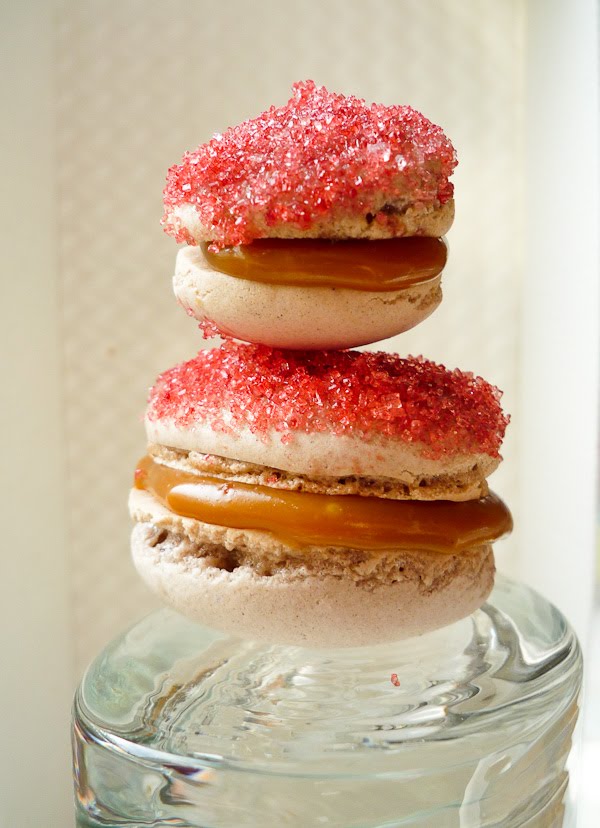
Baileys™ Caramel Macaron


I love Baileys and cocktails made from Baileys...so why not Macarons? I just learnt that we could easily dye sugar at home as well, so I am dying to try this out to decorate the bailey's macarons, just to make it more fancy ;)

I was very surprised that it's very simple to tint sugar at home. In the shop, they normally sell it for 6-7 euros for a 100g-200g bottle, and the choice of colours is limited. So I'm going to share this simple recipe here with you in addition to the macaron recipe.

DYED SUGAR
50g castor sugar
1-3 drops of food colouring of your choice, here I used red.

Note: if you use powder food colouring, simply dilute the colour with few drops of water and mix to get liquid colouring. The intensity of the colour can be modified easily, if you like darker intense colour add more colouring, if the colour is too dark, add more sugar.


Method:
1. In a big mixing bowl, pour in your sugar.
2. add in food colouring, and mix until well blend (you can wear a glove and do this with your hand)
3. Lay them out on cooking sheet for it to dry. Use on the same day. If you wanna store them, make sure that the sugar is completely dried before storing them away in an air tight container


Mini Macaron :)


FOR THE MACARON SHELL
1 room temperatured egg white(39-40g)
50g icing sugar
30g ground almond
30g castor sugar
1 teaspoon of sweetened cacao powder


Method:
1. Put ground almond, cacao powder and icing sugar in a food processor or a small blender. Blend them finely.

2. Sift the blended mixture and set aside

3. With an electric beater, Beat the egg white, start from low speed and increase slowly to maximum speed. Beat until frothy (you will see lots of fine bubbles)

4. Now it's the time to add in the castor sugar, add half of the sugar, continue to beat in maximum speed for around 2 minutes, add in the other half, continue until you get very stiff peak.

5. Mix the dry ingredients into the egg whites. This process is called Macaronage. Start folding with a rubber spatula. Continue to mix until you obtain a smooth lava flow batter.

6. When you get smooth shiny mixture, stop folding, lift the mixture with spatula, if the mixture falls back slowly in the bowl means you're good to go. You could also check if the lines formed from the lifted mixture, they should slowly disappear in within 30 seconds. At this stage you're good to go. Do not over fold, it will be too liquid and becoming very hard to pipe.
if you're unsure, you could refer to my basic macaron recipe as a guide HERE

7. Pipe the macaron on a baking sheet over baking tray. Hit the bottom of the baking tray with your hand to flatted out the macarons slightly.

8. Let your macarons sit for about 30minutes. This will depend on the humidity in your house and the day. Try touching the macaron softly, after 30mins. it should not stick to your hand.

9. Heat your oven to 150 C on the (heating on the top only). When the oven is ready, put your macaron at the very bottom shelf. Bake for 12 minutes, check them in the mid time of 6 minutes, the feets should already start forming. Turn the baking tray to the opposite direction to allow even baking. When the 6 mins is up, change the heating setting of your oven to Bottom only. This will help cooking the macaron and rise the feet more. Bake for another 6 minutes. You can test if the macaron is cook, touch softly on the shell and when the macaron doesn't slide on the feet, it's cooked. if it's not add another 1 mins each time and check.

(This is the method i found the best that works for me after few trial and error. I baked with heating the oven top and bottom and i had crack macarons. Having said that, every oven is slightly different than another, so please adjust accordingly)


10. Let the macaron cool down before removing them. You could wet your working area and slide the baking sheet on it to speed up the cooling process, but do not let it sit there too long, if not the macarons will become soggy. Other wise you can leave them cool at room temperature and remove them.


BAILEY'S™ CARAMEL GANACHE

Ingredients

50g white chocolate (chopped into small pieces)
63g Bailey's™ (Caramel Flavour preferably)
40g castor sugar


Methods

1. In a pot, pour in Bailey's and bring it to boil
2. Remove from heat, add in white chocolate, mix well until the chocolate melts completely
3. In another clean pot, pour in the sugar, without any water. Put the pot over the heat to make caramel. This process is easier to make caramel, but you have to watch it closely, once it starts to browned you have to stir it lightly, until all sugar is melt and a nice caramel colour is form. Do not put the heat too high and watch out so it won't burn.
4. When it's ready, pour it over the Bailey's mixture, becareful not to burn yourself, you may have to wear a protective glove.
5. Once pour in, stir quickly, the caramel may cake up. If it does, put it over low heat and continue stirring until it melts.


TO ASSEMBLE

1 egg white
1 cooking brush

Method:

1. Pour the dyed sugar in a bowl
2. When the macaron shells are ready, match up 2 shells in similar size. Put one up one down next to each other. The one facing up will be decorated with coloured sugar.
3. With the brush, dip lightly on the egg white and brush over the macaron shell.


4. Dip the macaron in the sugar, if needed, use a small spoon to put the sugar over to coat the shell more evenly.
5. Let sit for about 1 hour until the shell dry up
6. Pipe the ganache on the undecorated macaron shell then close it up with the decorated shell
7. Voila, it's done!! ENJOY :)

Wednesday, May 19, 2010

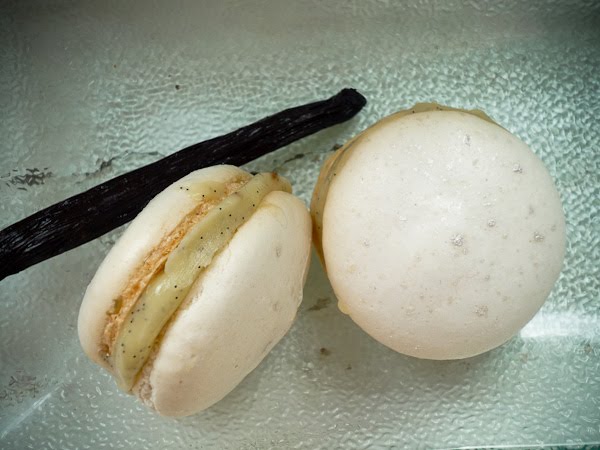
Vanilla Rum Macarons


I had a rush to create some macarons after coming back from holiday in Italy. I found some goodies to bake and try out some flavour in Italian supermarket. I found some amazing rum and anise flavouring on the baking section with an amazing price! In France this kind of stuff are found mostly in specialty shop, especially if you're looking for unordinary flavour.

So I decided to try out some adventurous flavour. This time vanilla rum macarons.


FOR THE MACARON SHELL
1 room temperatured egg white(39-40g)
50g icing sugar
30g ground almond
30g castor sugar
1/2 teaspoon white metalic food colouring


Method:
1. Put ground almond and icing sugar in a food processor or a small blender. Blend them finely.

2. Sift the blended mixture and set aside

3. With an electric beater, Beat the egg white, start from low speed and increase slowly to maximum speed. Beat until frothy (you will see lots of fine bubbles)

4. Now it's the time to add in the castor sugar, add half of the sugar, continue to beat in maximum speed for around 2 minutes, add in the other half, continue until you get very stiff peak.

5. Mix the dry ingredients into the egg whites. This process is called Macaronage. Start folding with a rubber spatula. Continue to mix until you obtain a smooth lava flow batter.

6. When you get smooth shiny mixture, stop folding, lift the mixture with spatula, if the mixture falls back slowly in the bowl means you're good to go. You could also check if the lines formed from the lifted mixture, they should slowly disappear in within 30 seconds. At this stage you're good to go. Do not over fold, it will be too liquid and becoming very hard to pipe.
if you're unsure, you could refer to my basic macaron recipe as a guide HERE

7. Pipe the macaron on a baking sheet over baking tray. Hit the bottom of the baking tray with your hand to flatted out the macarons slightly.

8. Sift the metalic food colouring over the shells.


9. Let your macarons sit for about 30minutes. This will depend on the humidity in your house and the day. Try touching the macaron softly, after 30mins. it should not stick to your hand.

10. Heat your oven to 150 C on the (heating on the top only). When the oven is ready, put your macaron at the very bottom shelf. Bake for 12 minutes, check them in the mid time of 6 minutes, the feets should already start forming. Turn the baking tray to the opposite direction to allow even baking. When the 6 mins is up, change the heating setting of your oven to Bottom only. This will help cooking the macaron and rise the feet more. Bake for another 6 minutes. You can test if the macaron is cook, touch softly on the shell and when the macaron doesn't slide on the feet, it's cooked. if it's not add another 1 mins each time and check.

(This is the method i found the best that works for me after few trial and error. I baked with heating the oven top and bottom and i had crack macarons. Having said that, every oven is slightly different than another, so please adjust accordingly)


11. Let the macaron cool down before removing them. You could wet your working area and slide the baking sheet on it to speed up the cooling process, but do not let it sit there too long, if not the macarons will become soggy. Other wise you can leave them cool at room temperature and remove them.


Vanilla Rum Ganache

Ingredients

50g white chocolate (chopped into small pieces)
10g liquid full cream
1 Vanilla (cut into half and remove the seeds inside - reserve the seeds - set aside)
1/2 teaspoon vanilla extract ( OR 1 teaspoon of vanilla flavouring )
1-2 drops of rum flavouring (the taste of rum can be very empowering, so please go easy with this)


Methods

1. In a small pot, pour in the liquid cream, add in the vanilla seed, warm it up lightly but do not boil it.

2. When the cream is warm enough pour over the chopped white chocolate.

3. Stir until you get a smooth consistent and all chocolate has dissolved.

4. Add in the vanilla aroma or extract .

5. Finally add in 1-2 drops of rum flavouring.

6. Stir and make sure the mixture is well mixed.

7. Fill your macaron immediately. Keep chill in an air tight container for up to 48 hours. Bring the macarons out of the fridge 20 mins prior serving for maximum taste! :) Enjoy

Thursday, April 29, 2010

Caramel Salted Butter Cream Macaron


FOR THE MACARON SHELL
1 room temperatured egg white(39-40g)
50g icing sugar
30g ground almond
30g castor sugar
1/2 teaspoon unsweetened cacao powder


Method:
1. Put ground almond, cacao powder and icing sugar in a food processor or a small blender. Blend them finely.

2. Sift the blended mixture and set aside

3. With an electric beater, Beat the egg white, start from low speed and increase slowly to maximum speed. Beat until frothy (you will see lots of fine bubbles)

4. Now it's the time to add in the castor sugar, add half of the sugar, continue to beat in maximum speed for around 2 minutes, add in the other half, continue until you get very stiff peak.

5. Mix the dry ingredients into the egg whites. This process is called Macaronage. Start folding with a rubber spatula. Continue to mix until you obtain a smooth lava flow batter.

6. When you get smooth shiny mixture, stop folding, lift the mixture with spatula, if the mixture falls back slowly in the bowl means you're good to go. You could also check if the lines formed from the lifted mixture, they should slowly disappear in within 30 seconds. At this stage you're good to go. Do not over fold, it will be too liquid and becoming very hard to pipe.
if you're unsure, you could refer to my basic macaron recipe as a guide HERE

7. Pipe the macaron on a baking sheet over baking tray. Hit the bottom of the baking tray with your hand to flatted out the macarons slightly.

8. Let your macarons sit for about 30minutes. This will depend on the humidity in your house and the day. Try touching the macaron softly, after 30mins. it should not stick to your hand.

9. Heat your oven to 150 C on the (heating on the top only). When the oven is ready, put your macaron at the very bottom shelf. Bake for 12 minutes, check them in the mid time of 6 minutes, the feets should already start forming. Turn the baking tray to the opposite direction to allow even baking. When the 6 mins is up, change the heating setting of your oven to Bottom only. This will help cooking the macaron and rise the feet more. Bake for another 6 minutes. You can test if the macaron is cook, touch softly on the shell and when the macaron doesn't slide on the feet, it's cooked. if it's not add another 1 mins each time and check.

(This is the method i found the best that works for me after few trial and error. I baked with heating the oven top and bottom and i had crack macarons. Having said that, every oven is slightly different than another, so please adjust accordingly)


10. Let the macaron cool down before removing them. You could wet your working area and slide the baking sheet on it to speed up the cooling process, but do not let it sit there too long, if not the macarons will become soggy. Other wise you can leave them cool at room temperature and remove them.


Caramel Salted Butter Cream

Ingredients

For the Salted Caramel Cream
60g castor sugar
15g salted butter (cut into small cube ~ 5 cm - room temperature)
67g fresh full cream

For the Butter Cream
20g Salted butter (Cut into small cubes room temperature)
35g Butter (Cut into small cubes room temperature)


Methods

We'll prepare the Salted Caramel Cream first
1. In a small pot, pour in half quantity of the castor sugar. Wait until the sugar dissolve then add in the rest.

2. Once the sugar starts to melt, beware and watch closely, because it will burn quickly if it's not remove from the heat quick enough. Stir lightly, once the sugar turn brown, and smell caramelised, remove immediately from heat. BE CAREFUL NOT TO BURN YOURSELF.

3. Add in 15g salted butter, stir with a wooden spatula until the butter is melted.

4. Add in the 1/3 off fresh cream, stir and mix, then another 1/3, repeat until all cream is added .

5. Pour it over a wide and flat container, if not a curved plate would do as well.

6. Put into the fridge, for about 2 hours, until the caramel cream is cold and harden slightly

Butter Cream
1. When the caramel cream is ready, bring it out of the fridge, set aside.

2. Immediately, in a mixing bowl, add in the salted butter, and butter.

3. with an electric beater, beat up the butter until it's well incorporated.

4. Add the Caramel Cream in the mixing bowl. Continue to beat until a smooth, consistent texture is obtain.


Fill your macaron immediately. Keep chill in an air tight container for up to 48 hours. Bring the macarons out of the fridge 20 mins prior serving for maximum taste! :) Enjoy